A handy 'How To' for our editorial team. This guide walks you through the steps on how to create a Magazine list (this includes Top 10s and any list over 5 items in length!)
It's very important you follow these steps to a 't,' in this order. Don't deviate and jump ahead a step.
*********
1. Do the initital proofing and post of the content (text only. no images yet). Note: If you do your columns in Word first (which we don't recommend), when you Paste the content in here, use 'Paste From Word' option. It's on our main format toolbar on the top row.
2. Number each list title 1-10.
3. Highlight each title, one by one, and change its format to Heading 2. (Format dropdown arrow on left of bar)
Note: Make sure that each H2 headline isn't bolded or italicized. (In general, you should never format a headline)

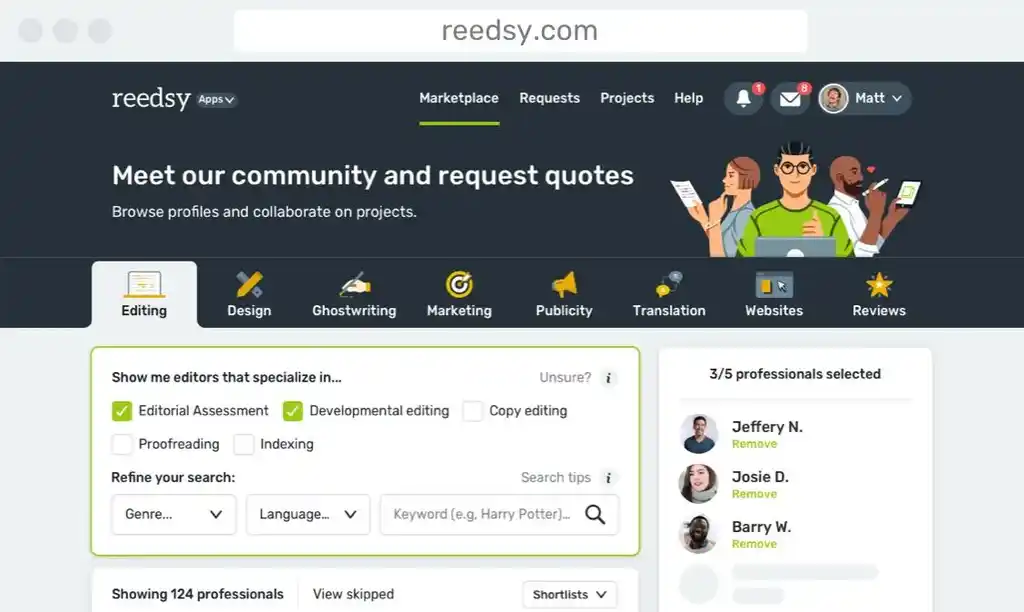
4. With your actual content now starting to resemble a list, it's time to uploading your images. To do this, scroll down on the form and you'll see an Attached Image section (see below):

Before you continue, go and upload all of your images. If it's a book cover you're uploading, make sure the image is portrait, doesn't have any of those pesky white borders on it, and that you format the title of the file (before you upload it!) as book-title.jpg (all lowercase, dashes between words, NOT SPACES). In general, we prefer images to be small in file size. Under 50kb if possible, and JPGs only. And for book covers, their width should be about at least 150px width. Doesn't have to be exact, but more than that is a must. Any smaller and our script will pixellate them.
5. Once you have all the covers uploaded on your form, it's time to insert them into your list. To do this, put the cursor next to the left of your first list item (your Heading 2 for the first on the list). For an example, see below where the [here] is.
[here] 10. Harry Potter and the Deathly Hallows
Once your cursor is blining there, go back down to the attached image for this item, and in the drop-down besides the image, choose 'Lightbox2: content-list' and click Insert. This will place the image on your list. Now mind you, it will look off at first. That's because you then have to select the image, and choose 'Float Left' from the 'Styles drop-down above.

6. Now that you have all of your content and images on your list, it's time to make it look pretty! You'll notice that our lists have text that aligns a certain way and doesn't wrap around the image. See below for an image of this indentation:

7. Time to insert your Amazon buy links. Note: You only obviously do this for lists about books. Also note: if you have 3 or less items to link, just place them in the standard Amazon purchase links below. (then again, if you have less than 3 items, this wouldn't be a "list" really). But this is a list, and therefore, you'll have a lot of Amazon links to pimp to folks. The non-annoying way we do this, is through that red Buy The Dollhouse Murders from Amazon.com link above.
Here's how you get that automatic link in below your list item. First, go to Amazon and grab the ISBN or AISN of the product you're linking. Always be sure to grab the most relevant version of the book. Once you have it, type this in below your list item"
[amaxon ISBN inline]
*Be sure to spell Amazon correctly. I only mispelled it so that coded tag would appear here.
Make sure to copy the ISBN from Amazon with no extra spaces after it, or else the link won’t work. Example: This 1935950045 (WRONG) vs. this 1935950045 (RIGHT)
8. After you insert the Amazon code (which will show up as a finished link once you ‘Submit’ the column), hit Enter to create another line (this creates a p / paragraph break). Once you have this paragraph break made, keep the cursor in it and, using the second drop-down arrow, select ‘Clear.’
![]()
Do this for every list entry except the last one (#10).
9. Once you get to the bottom of your list, add in a horizontal line. (it’s on the format bar). And below that, put in your closing line, or epilogue.
10. Last step, is to go into the ‘Source’ (you click it on the format bar, top left). This reveals the HTML of the column. Go to directly above the first H2 tag and insert this: <div class="mag-list-images">. I included a screenshot example below, with the code you have to manually insert, highlighted:

Click to make larger
11. Close the div class before writing your final summary with </div class="mag-list-images">
That's it! This will be a little confusing the first few times, but pretty soon, it will be secondhand. As always, hit me up on gChat if you have questions. And if you're not sure about a certain step, just ask.

About the author
Dennis Widmyer is the founder of ChuckPalahniuk.net, best-selling author Chuck Palahniuk's (Fight Club, Choke) official website. His passion in life is making movies. With partner Kevin Kölsch, he founded Parallactic Pictures, a banner for all of their independent film projects. To date, the duo have directed two features, a number of shorts, and have penned over a dozen screenplays. He recently co-directed a feature horror film called STARRY EYES for Snowfort Pictures and Dark Sky Films that had its world premiere at the 2014 SXSW film festival. You can see more of his work at www.parallacticpictures.com. When he's not making movies and working on websites, he enjoys going to the movies, writing, reading, photography, hiking, cats and hanging out with friends.